The alto saxophone is a relatively easy instrument to put together, especially once you have gotten the mouthpiece put together. While it is quite easy to assemble, there are fragile pieces, so you must be cautious when putting it together.
Part 1: Assembling the mouthpiece
1. Start by putting the thinner end of the reed in your mouth for about a minute or so. The reed has to be wet because it needs to vibrate quickly and with energy. You can also choose to submerge the reed in a little glass of water for a couple of minutes.
2. Now that your reed is moist, it's time to put it on the mouthpiece. After taking it out of your mouth, put the flat side of the reed onto the flat part of the mouthpiece. The thin end of the reed should line up with the thin end of the saxophone. If the reed isn't lined up with the mouthpiece, you won't be able to get a nice tone out of the instrument.
3. After putting your reed on the mouthpiece, you will now put the ligature onto the mouthpiece. Make sure that the wider end of the ligature goes on first to match the shape of the mouthpiece. While adjusting the ligature to the mouthpiece, hold the reed with your thumb so that it doesn't move around.
If the ligature is too tight to fit over the mouthpiece, you can loosen it by moving the screws counterclockwise. It should fit snuggly around the mouthpiece. The screws should be match up to the thick part of the reed. The ligature should also be tight enough that the reed does not move around. Do not tighten it anymore past this point because you can damage the reed.
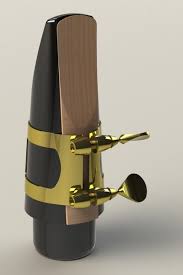
Your mouthpiece should now look like this:
2. Now that your reed is moist, it's time to put it on the mouthpiece. After taking it out of your mouth, put the flat side of the reed onto the flat part of the mouthpiece. The thin end of the reed should line up with the thin end of the saxophone. If the reed isn't lined up with the mouthpiece, you won't be able to get a nice tone out of the instrument.
3. After putting your reed on the mouthpiece, you will now put the ligature onto the mouthpiece. Make sure that the wider end of the ligature goes on first to match the shape of the mouthpiece. While adjusting the ligature to the mouthpiece, hold the reed with your thumb so that it doesn't move around.
If the ligature is too tight to fit over the mouthpiece, you can loosen it by moving the screws counterclockwise. It should fit snuggly around the mouthpiece. The screws should be match up to the thick part of the reed. The ligature should also be tight enough that the reed does not move around. Do not tighten it anymore past this point because you can damage the reed.
Your mouthpiece should now look like this:
Part 2: Assembling the larger pieces
1. Before you assemble the instrument, put the neck strap on. Let the neck strap rest around your neck like necklace. It is recommended to adjust the neck strap once the saxophone is attached to it.
2. Now take your fully assembled mouthpiece and attach it to the neck. To attach the mouthpiece to the neck of the saxophone, use a light, forward and backwards twisting motion. Keep twisting it until the mouthpiece is about halfway. The side with the reed on it should be facing down.
- If you have trouble getting your mouthpiece onto the neck, you can apply what is called cork grease to the cork on the neck to make the mouthpiece go on the neck more smoothly.
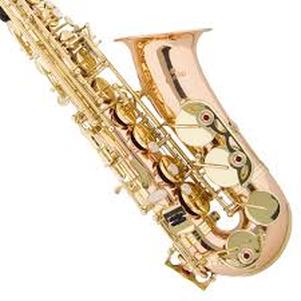
3. Pick up the body of the saxophone. It looks like this:
2. Now take your fully assembled mouthpiece and attach it to the neck. To attach the mouthpiece to the neck of the saxophone, use a light, forward and backwards twisting motion. Keep twisting it until the mouthpiece is about halfway. The side with the reed on it should be facing down.
- If you have trouble getting your mouthpiece onto the neck, you can apply what is called cork grease to the cork on the neck to make the mouthpiece go on the neck more smoothly.
3. Pick up the body of the saxophone. It looks like this:
It is recommended to lift the saxophone up by the bell (The area where there are no keys or valves) as to not accidentally break the apparatuses that makes the instrument work. Grip your fingers around the bell and lift it up.
5. About halfway down the saxophone, there is a small metal hoop. This is what your neck strap will be attached to. Connect the neck strap to the hoop by opening the hook of the neck strap and fastening it to the hoop.
6. Now slide the neck on to the body. Using the same motion as you did when you attached the mouthpiece to the neck, press the neck of the saxophone until it is completely all the way in. The tip of the mouthpiece should line up perfectly with the rest of the instrument and create one straight line from the reed to the bell of the saxophone.
- Do not force the pieces together because you can damage them. If you are having difficulties putting them together, you might have to consult an instrument repair shop.
- Also be aware of the the octave key built into the neck of the instrument while you are attaching it to the saxophone's body.
7. Adjust the neck strap as much as you need to. You can loosen your grip on the saxophone because the neck strap should be bearing the majority of the weight of the saxophone. The neck strap should hold the saxophone exactly where you will be playing it.
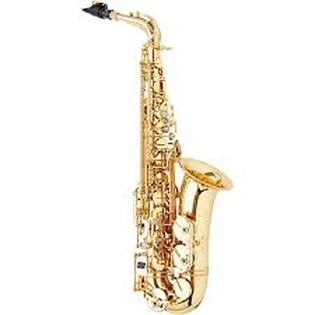
Here is what your now assembled saxophone will look like:
5. About halfway down the saxophone, there is a small metal hoop. This is what your neck strap will be attached to. Connect the neck strap to the hoop by opening the hook of the neck strap and fastening it to the hoop.
6. Now slide the neck on to the body. Using the same motion as you did when you attached the mouthpiece to the neck, press the neck of the saxophone until it is completely all the way in. The tip of the mouthpiece should line up perfectly with the rest of the instrument and create one straight line from the reed to the bell of the saxophone.
- Do not force the pieces together because you can damage them. If you are having difficulties putting them together, you might have to consult an instrument repair shop.
- Also be aware of the the octave key built into the neck of the instrument while you are attaching it to the saxophone's body.
7. Adjust the neck strap as much as you need to. You can loosen your grip on the saxophone because the neck strap should be bearing the majority of the weight of the saxophone. The neck strap should hold the saxophone exactly where you will be playing it.
Here is what your now assembled saxophone will look like: